- Home
- Shop
- About Us
- Contact Us
- My account
- Your Cart
-22%
New
Custom T-Shirts
$17.99$22.99
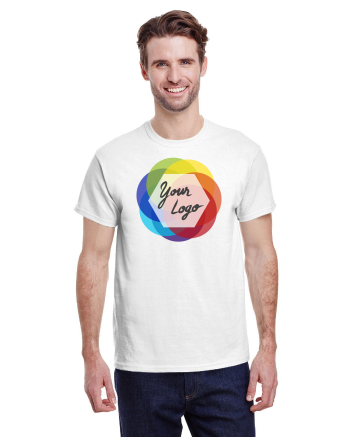
Any design your way! Create a custom t-shirt with our custom designer tool or upload your own design. Printed in Canada on a professional DTG printer. Shipped within 7 business days!
Description
Any design your way! Create a custom t-shirt with our custom designer tool or upload your own design. For this type of printing we prefer PNG files with no shadows or transparencies. Don’t worry, we always check your files before printing to make sure they wont look funny when you get your shirt & send an approval. If you are looking for something that you can’t find on our website please reach out to us on our Contact Us page
Our T-shirts are ready to be printed with your custom design.
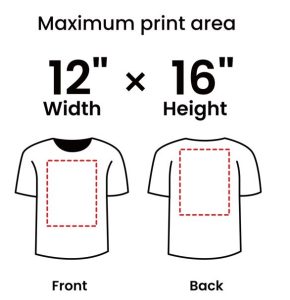
More DTG Guidelines to follow
1. Create and upload elements of your artwork
For best results, we recommend building your artwork in our mockup generator platform. This means you create elements of your artwork in your usual design software and save each element (e.g. logo, slogan) as a separate file. You do not need to create a complete printable file with all the elements together. You can upload your elements as individual files in our mockup generator and position them there to create the printable layout you require.
2. Submit files in PNG or JPEG format with at least 150 DPI
We recommend using PNG for designs with a transparent background. For other designs, we advise preparing files in JPEG instead.
3. Create files in sRGB color profile
To ensure that your design looks as close as possible to what appears on your screen, make sure you create your print file in sRGB color profile.
• Use transparency to your advantage
Black ink will appear less black(dark grey) on black garments because of the white underbase used during printing. Leave these areas fully transparent when designing for black garments
• Avoid semi-transparent designs
Semi-transparent graphics (or elements with lowered opacity) don’t translate well in DTG printing. We advise using solid colors or simulating semi-transparency by halftoning
• Create designs with the necessary DPI
Simply typing in a new resolution value into the file won’t result in a higher resolution print. If your graphic’s resolution is too low, the best solution is to recreate it.
| S | M | L | XL | 2XL | 3XL | 4XL | 5XL | |
|---|---|---|---|---|---|---|---|---|
| Width | 18″ | 20″ | 22″ | 24″ | 26″ | 28″ | 30″ | 32″ |
| Length | 28″ | 29″ | 30″ | 31″ | 32″ | 33″ | 34″ | 35″ |
| Sleeve Length | 15.62″ | 17″ | 18.5″ | 20″ | 21.5″ | 22.87″ | 24.25″ | 25.38″ |
| Disclaimer: | This is intended to be a guide only, and while we do our best to ensure all our sizing is consistent, you may find that some styles vary in size. Our garment sizes correspond to the size charts provided by our suppliers with up to 1 inch tolerance in potential variance (smaller or larger). Follow instructions on laundry tag for best care results. SinaLite is not responsible for damage caused otherwise. |
How to measure:
WIDTH: Lay garment flat. 1″ below the armhole flat measure the garment across the chest.
LENGTH: Lay garment flat (face down). Measure from center back neckline seam straight down to bottom of the front hem.
SLEEVE LENGTH: Lay garment flat(face down). Measure from center back neck to outer edge of shoulder seam, then along outer edge to sleeve end.
Printed Apparel Care Instructions
The tag on each garment contains recommended care instructions for the garment itself; however, these instructions don’t take into account the direct-to-garment (DTG) printing process.
To help DTG printing last as long as possible, we recommend following the instructions below:
Washing
- Turn the garment inside-out
- Machine wash cold with like colors
- Use mild detergent and a gentle cycle
- Use non-chlorine bleach only when necessary
- Do not dry clean or use any fabric softeners
Drying
- Hang dry when possible
- Tumble dry on a low cycle when necessary
Ironing
- Iron inside-out on a cool setting
- Do not iron the printed area




Reviews
There are no reviews yet.